Category Archives: And I Make Things

Patch made of five overlapping circles of cloth, in various shades and patterns of blue, arranged in a flower shape and stitched all over with off-white thread, on a pair of dark blue jeans.

Boot(cut) and cats

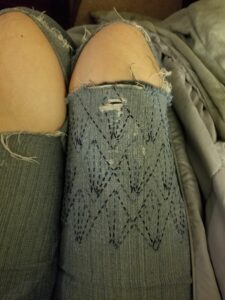
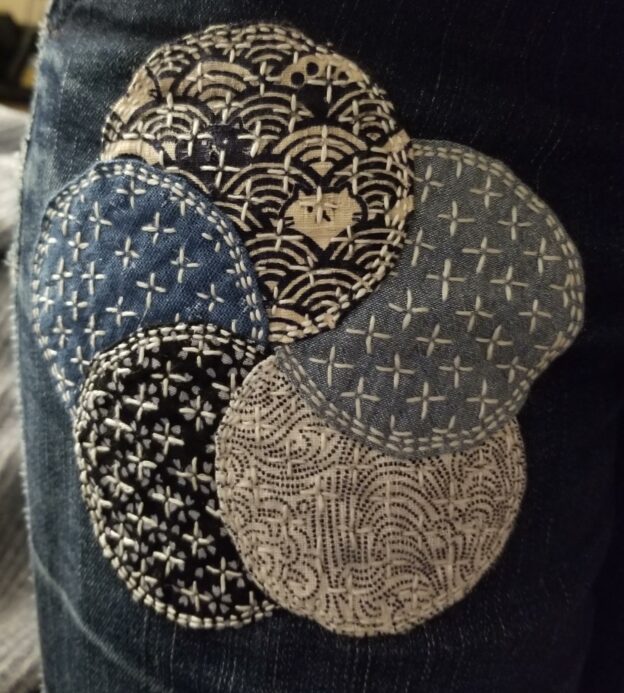
My favorite pair of jeans cost me $8. They were originally intended to complement a leather jacket and a ripped tank top soaked in fake blood as part of an October Daye cosplay, but I liked them too much not to keep wearing them. Alas, denim doesn’t last forever, moreso when it’s the stretch kind, and I’ve made a repair near one pocket already. Now the area over the front pocket is wearing out, and so are some places along the side seams. Time to beautify.

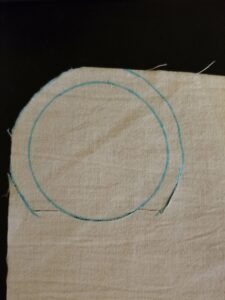
I initially thought I could just put a field of classic sashiko over the entire area, but as time went on and I didn’t do it, enough of the fabric eroded that that wasn’t going to work anymore. I was going to need a patch, and after a little thinking I had an idea of what I wanted to do. First I needed some more fabric in coordinating colors, and the Japanese fabric scrap pack from Snuggly Monkey (yes this is going to be a should-be-sponsored post) had exactly what I was looking for. I traced circles on five of the pieces, added a seam allowance around about 2/3 of each, and basted a quick hem.

Off-white fabric with an inner circle traced in blue, an outer circle traced most of the way around, partly cut out.
After all this, I didn’t end up using this one. Too contrasty.

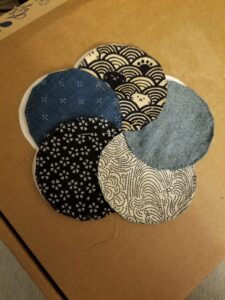
Arrange into a plumeria and baste together.

Five overlapping circles of patterned fabric, forming a flower shape. Patterns, clockwise from top: dark blue waves interspersed with cats and pawprints on an off-white background, plain light blue, wind/water swirls made of dark blue dots on off-white, five-petaled white flowers on navy blue, small white plus signs on medium dusty blue.
EEEEEE THE CATS LKJDSKLJSDFJLKJ

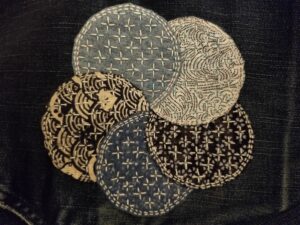
At the last minute, I decided I needed a backing to prevent ongoing wear from ruining the patch from behind. I picked some gray suiting that had a little stretch to it, and promptly discovered that it was very fray-prone and I should have cut it bigger. In True Me Fashion, I did not. I did, however, learn from last time regarding the alignment of patches inside to outside, and traced around the basted-on patch to get it situated properly. Then I did another round of basting before stitching a double seam around the visible edge of each circle with off-white sashiko thread. I didn’t get a picture of this step, but the stitching is (obviously) visible in the final shot.

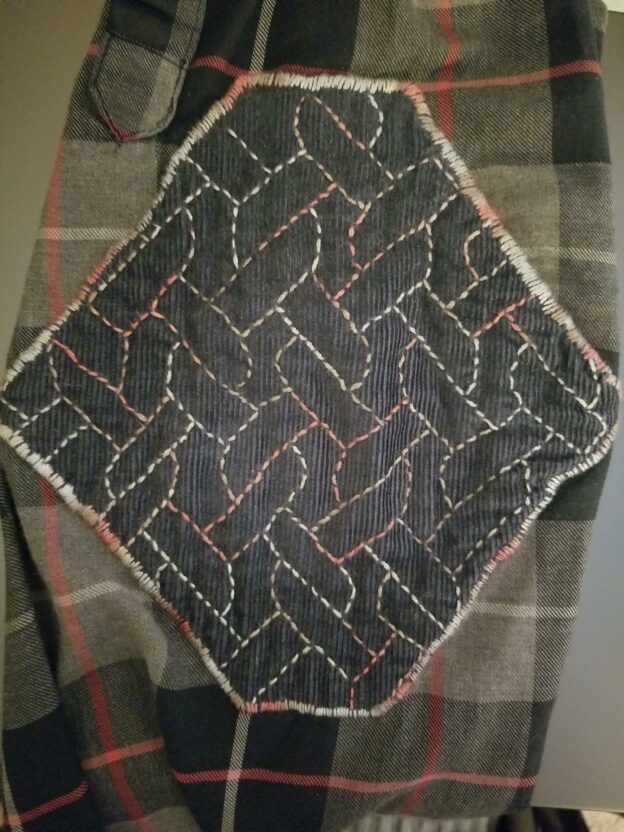
Now for the brainfuck. I knew I wanted to do an all-over pattern, and I thought I might just go with jujizashi, but it didn’t look quite right. After a little experimentation, I settled on something similar, but with the center clear. The plan was to have the pattern on the same grid (as measured by plastic canvas) over the whole patch. The problem was that I couldn’t just use a single method for marking the grid, because of all the different colors. My blue marker showed up on everything light, but not anything dark. And the cat print, being both, was a total nightmare. After several false starts, I ended up wetting a water soluble white marking pencil to ensure the pigment stuck to the fabric, realigning the canvas grid for each section so as not to rub the marks off while stitching.

Patch made of five overlapping cloth circles in various shades of blue, arranged in a flower shape, with cross shapes stitched all over.
Believe it or not, this is after REMOVING a bunch of the markings.

It really helped to mark out the lines at first. As I went along, I only had to mark five dots per cross. (Except when I miscounted.)

Patch made of five overlapping circles of cloth, in various shades and patterns of blue, arranged in a flower shape and stitched all over with off-white thread, on a pair of dark blue jeans.
Looks pretty good, if I do say so myself. I just wish I’d looked closer at the grid to avoid stitching over the one cat face that way.

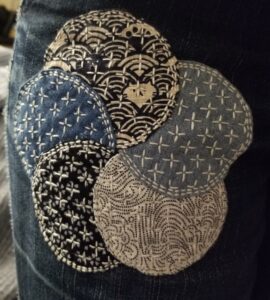
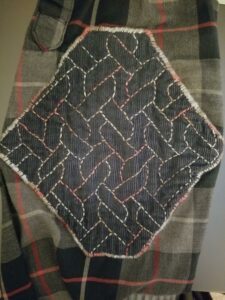
The finished patch! Still need to reinforce the seams with twill tape and cover them up with the ribbons I got from Etsy. Yes, this is all on a pair of $8 jeans, but hey, it’s about the process as much as the result. And both were awesome.

Background: black, gray, and red plaid fabric. Foreground: navy blue corduroy fabric stitched around the edge and in an all-over pattern of linked ropes with variegated red-and-gray thread.

Still not sashiko

After succeeding with the jeans (which now need a repair at the back pocket seam just like the other ones the same age), my next project was the elbow of my husband’s flannel shirt. I really wanted to use fabric from his old corduroy overshirt, and thankfully there was a nice stretch of it that hadn’t faded or worn too much. He picked this pattern:

Blue fabric stitched in white with a pattern of outlined linked ropes
You can do this on a square or triangular grid. We picked square.

Technically, this isn’t a sashiko design as it doesn’t leave the right amount of space between stitches. However, it does still work well if you make the adjustment. (As an aside, if you go looking for images of sashiko patterns and find them saved to Pinterest, 90% of the time they’ll be linked via a scraped or malware-infested site. Especially if they look like the one above. Don’t bother clicking through to find more or get pointers. Just save the image and move on.)

The fabric of the shirt was seriously shredded, so I had to baste on an inner patch in addition to the outer one. This meant two hems, which I didn’t do a great job of aligning atop each other because I stitched the pattern before the edging. On the other hand, it meant less of a ridge around the edge in most places. Still, from now on I’ll be sewing the edges first to avoid this issue.

Background: black, gray, and red plaid fabric. Foreground: navy blue corduroy fabric stitched around the edge and in an all-over pattern of linked ropes with variegated red-and-gray thread.
This took me waaaaay too long.

The thread I used is by Cottage Garden Threads, 6-strand in colorway Earl Grey, from Snuggly Monkey. It is EXACTLY the colors of the base shirt and I couldn’t believe it when I first saw it. Sadly, several of the other supplies I got from the site weren’t made to work with corduroy, and I ended up mostly drawing the pattern as I went so as to keep it from rubbing completely off. If you do this, I recommend keeping track of your grid with something better than holes poked in graph paper. Me, I’ll be trying to solve the alignment problem and the grid problem together by basting through marked tissue paper. Sometime later, because my next project is another can of worms entirely.

Sorta sashiko

If you offer me the opportunity to save money, reduce waste, and make things prettier all at once, I’m going to say HELL YEAH. So sashiko is exactly the kind of thing that makes me have to repeat to myself “I do not need another craft I do not need another craft I do NOT need ANOTHER CRAFT” and then pick it up anyway.

Front thigh panel of a pair of ripped blue jeans, decorated with sashiko-style stitching of variegated blue tones in an art-deco diamond fan pattern, photographed while worn.
My first attempt at sashiko. There will be more, but these jeans needed immediate help.

Traditional sashiko patterns are largely geometric, like the compass flowers I constructed all over my math book cover in high school (don’t lie, you knew somebody bored enough to do that too). So are art deco designs, I reasoned, and found one I liked. It took a few repeats and false starts to settle out the math and the technique for the bottom starpoint, mainly because I was frustrated that there’s no logical way to make this pattern without carrying thread. But laying down the outer diamonds first (for both strength and guidelines) and then filling in the rays became a really nice rhythm. I added a piece of salvaged corduroy shirt behind the row closest to the rip, and my only regret is not having decided on that before making the row above, because it would’ve been held on better.

Next up: elbow patches made from more of the same corduroy shirt on the flannel that replaced it, stitched with thread in the colors of the flannel. Maybe I’ll try a shippou and hope it doesn’t end in shippai.